http://www.facebook.com/pages/Varun-Ramesh/127772243743?ref=ts
Just wanted to direct everyone here to my Facebook page, which will always be more updated than any of my blogs.
Thursday, January 21, 2010
Wednesday, November 25, 2009
Demo Release
Here is a link to the first public release of Star of Doom!
http://www.filefront.com/14998949/SOD-Release-1.msi/
http://www.filefront.com/14998949/SOD-Release-1.msi/
Demo Soon
Sorry that I haven't updated this blog in a while, but I've been bogged down with school work and the whole highschool transition thing. On the bright side, I am ready to publish the binaries for the demo in the video below. Check back tomorrow for it!
Friday, August 7, 2009
New Features
Guess What! I've added some new features, including planetary gravity, and movement, as well as some other cool stuff!
Sunday, March 29, 2009
Normal mapping
Here I'm going to explain the concept of normal mapping and it's uses to enhance a gaming experience. All of the 3d models were created in blender3d. The textures were created with Gimp.
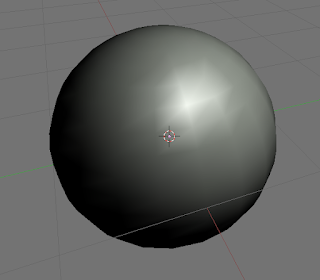


First of all, games originally used vertex lighting. This is a technique in which the lighting for each vertex is individually calculated, then the color of the surface is actually interpolated. This is basically an approximation.
Vertex Lighted Sphere
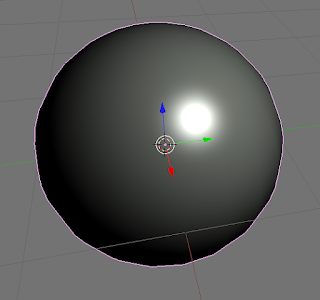
But now, with the advent of more powerfull graphics cards, we are able to come closer and closer to more realistic lighting. From that, emerged per-pixel lighting. This technique calculates the lighting color of each and every pixel that is drawn on the object.
Per-pixel Lighted Sphere
As you can see, this is much closer to actual lighting and specularity.
Now to determine the orientation of any suface in relation to a light, normals are used. These are generally a perpendicular line to the surface showing its orientation. The concept of normal mapping is to assign a seperate normal to each pixel, and to slightly change the normal to effect the way light falls on the surface. When this happens, the specularity, and other shading is actully distorted to give the appearance of bumps and troughs, except in predictable possitions. These are normally added on to a diffuse (color) texture to make it seem as if a flat surface, such as one textured with bricks has all of the individual bumps. This gives the appearance of detail without actually having detail.
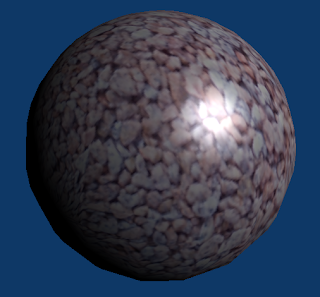
Sphere with rock texture (no normal map)

Sphere with rock texture (normal mapped)

With the two examples above, the difference is pretty obvious. Unfortunately, to be able to preform realtime normal mapping, Pixel Shader 2.0 is required. This is because it is done through shader and fragment programs that run on your graphics card. You can do software (on the CPU) normal mapping, but it is extremely slow, in comparison.
To actually change the normals of the surface, an image called a normal map is used.
Normal map

Based of the RGB values, the direction of the normal is determined.
- Red(0 to 255) maps to X(-1 to 1)
- Green(0 to 255) maps to Y(-1 to 1)
- Blue(0 to 255) maps to Z(0 to 1)
Because of the fact that normals must point away from the surface, negative Z values cannot be used.
Using normal mapping, various effects can be achieved.
Wednesday, March 11, 2009
Space Updates
For those of you who don't know, a skydome is a sphere that is rendered first always, thus making it seem to be an infinite distance away. This effect is achieved by drawing all other object in front of the dome.


On the day side of the planet, you can observe crappy cloud systems (The cloud sphere just rotates) and a red poluted atmosphere (fog effect).


Monday, February 23, 2009
Peron
Take a look! A rendition for the planet Peron! This image was made gimp using the various tools. It's an amazing software!
Background stars : HSV Noise Filter
Planet: Map To Sphere
The surface image was composited from a cloud layer and the ground layer (also made in GIMP)
Atmosphere: Radial Gradient
Foreground Star: Super Nova Filter

Subscribe to:
Comments (Atom)